Required Reading
Pebble SDK 2.0 Tutorial #1: Your First Watchapp
Pebble SDK 2.0 Tutorial #2: Telling the Time
Pebble SDK 2.0 Tutorial #3: Images and Fonts
Pebble SDK 2.0 Tutorial #4: Animations and Timers
Pebble SDK 2.0 Tutorial #5: Buttons and Vibrations
Pebble SDK 2.0 Tutorial #6: AppMessage for PebbleKit JS
Pebble SDK 2.0 Tutorial #7: MenuLayers
Pebble SDK 2.0 Tutorial #8: Android App Integration
Pebble SDK 2.0 Tutorial #9: App Configuration
Introduction
In this section of the tutorial series, I will be covering some of the Event Services introduced in the 2.0 version of the Pebble SDK which have been oft requested due to their popularity in newer, interactive watchfaces. Namely:
- Bluetooth Connection Service
- Battery State Service
- Accelerometer Service (tap and raw)
- App Focus Service (not covered, but works identically to the Bluetooth Connection Service)
Setup
To begin with, we will be using the blank template from before, shown below for convenience. Create a new CloudPebble project and start a new C file with the template as its contents:
#include <pebble.h>

static Window* window;

static void window_load(Window *window)
{

}

static void window_unload(Window *window)
{

}

static void init()
{
  window = window_create();
  WindowHandlers handlers = {
    .load = window_load,
    .unload = window_unload
  };
  window_set_window_handlers(window, (WindowHandlers) handlers);
  window_stack_push(window, true);
}

static void deinit()
{
  window_destroy(window);
}

int main(void)
{
  init();
  app_event_loop();
  deinit();
}
Bluetooth Connection Service
The first Event Service we will be using is the Bluetooth Connection Service, which allows us to see the current connection status as well as subscribe to updates (only while Bluetooth is actually connected, so be careful with debug logs), much in the same way as with the TickTimerService. Firstly, we will create a TextLayer in window_load() to use for showing the events happening. First is the global pointer:
static TextLayer *bt_layer;
then creation proper in window_load(). Note the use of bluetooth_connection_service_peek() to show the state of the connection at the time of creation. As always we also add the corresponding destruction function call to free memory:
static void window_load(Window *window)
{
  //Setup BT Layer
  bt_layer = text_layer_create(GRect(5, 5, 144, 30));
  text_layer_set_font(bt_layer, fonts_get_system_font(FONT_KEY_GOTHIC_18));
  if(bluetooth_connection_service_peek() == true)
  {
    text_layer_set_text(bt_layer, "BT: CONNECTED");
  }
  else
  {
    text_layer_set_text(bt_layer, "BT: DISCONNECTED");
  }
  layer_add_child(window_get_root_layer(window), text_layer_get_layer(bt_layer));
}

static void window_unload(Window *window)
{
  text_layer_destroy(bt_layer);
}
Next we will subscribe to the BluetoothConnectionService to update this TextLayer whenever the status of the Bluetooth connection to the phone changes. Like a TickHandler, we start by creating a function to use as a handler with the correct signature, and fill it with logic to change the text displayed. This should be placed before init(), where it will be registered:
static void bt_handler(bool connected)
{
  if(connected == true)
  {
    text_layer_set_text(bt_layer, "BT: CONNECTED");
  }
  else
  {
    text_layer_set_text(bt_layer, "BT: DISCONNECTED");
  }
}
The final step is to perform the actual subscription, which is very easy to do, and happens in init():
//Subscribe to BluetoothConnectionService
bluetooth_connection_service_subscribe(bt_handler);
After compiling and installing the project, try disconnecting and re-connecting your phone’s Bluetooth radio a few times and observe the result.
Battery State Service
The next Event Service we will be adding will be the Battery State Service, which provides information on the Pebble’s battery. It provides more detail than a simple bool, including charging status and whether the cable is plugged in or not. As before, we will create a new TextLayer to show the output. Add the pointer to the last one in the declaration:
static TextLayer *bt_layer, *batt_layer;
Then, perform the proper creation in window_load(). This time, the information provided by the Battery State Service comes in the form on the BatteryChargeState data structure, with fields as shown in the documentation. It is worth noting that the Service only returns the battery charge in increments of 10. The setup of the new TextLayer is shown below:
//Setup Battery Layer
batt_layer = text_layer_create(GRect(5, 25, 144, 30));
text_layer_set_font(batt_layer, fonts_get_system_font(FONT_KEY_GOTHIC_18));
layer_add_child(window_get_root_layer(window), text_layer_get_layer(batt_layer));

//Get info, copy to long-lived buffer and display
BatteryChargeState state = battery_state_service_peek();
static char buffer[] = "Battery: 100/100";
snprintf(buffer, sizeof("Battery: 100/100"), "Battery: %d/100", state.charge_percent);
text_layer_set_text(batt_layer, buffer);
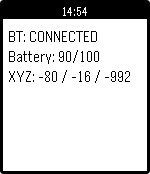
After re-compiling, the battery charge percentage should be shown below the Bluetooth status.
Accelerometer Service (tap)
The Accelerometer Service operates in a very similar manner to the previous two Event Services, but can operate in two modes: tap and raw data. The tap mode will call a handler that we subscribe when the Pebble is tapped (or wrist is shaken), whereas the raw data mode will supply X, Y and Z values at an rate we select. I’ll show both of these for the sake of completeness. An application of the latter mode can be seen here.
First, we create a further TextLayer to show the output data:
static TextLayer *bt_layer, *batt_layer, *accel_layer;
The first mode we will use is the tap mode. Let’s create the TextLayer proper in window_load():
//Setup Accel Layer
accel_layer = text_layer_create(GRect(5, 45, 144, 30));
text_layer_set_font(accel_layer, fonts_get_system_font(FONT_KEY_GOTHIC_18));
text_layer_set_text(accel_layer, "Accel tap: N/A");
layer_add_child(window_get_root_layer(window), text_layer_get_layer(accel_layer));
Next, we will create the handler function to be called whenever a tap is detected, and furnish it with logic to show what kind of tap was detected:
static void accel_tap_handler(AccelAxisType axis, int32_t direction)
{
  switch(axis)
  {
  case ACCEL_AXIS_X:
    if(direction > 0)
    {
      text_layer_set_text(accel_layer, "Accel tap: X (+)");
    }
    else
    {
      text_layer_set_text(accel_layer, "Accel tap: X (-)");
    }
    break;
  case ACCEL_AXIS_Y:
    if(direction > 0)
    {
      text_layer_set_text(accel_layer, "Accel tap: Y (+)");
    }
    else
    {
      text_layer_set_text(accel_layer, "Accel tap: Y (-)");
    }
    break;
  case ACCEL_AXIS_Z:
    if(direction > 0)
    {
      text_layer_set_text(accel_layer, "Accel tap: Z (+)");
    }
    else
    {
      text_layer_set_text(accel_layer, "Accel tap: Z (-)");
    }
    break;
  }
}
Finally, we subscribe our handler function to the Accelerometer Event Service in init():
//Subscribe to AccelerometerService
accel_tap_service_subscribe(accel_tap_handler);
You should now be able to see the result of tapping the watch. Personally I’ve found that shaking the wrist is a more reliable way of triggering events (such as showing more information on a watchface), but taps can still be used as an option.
Accelerometer Service (raw data)
Finally, we will use the raw data mode of the Accelerometer Service. To do this, we will first remove the existing Accelerometer Service subscription (but still keep the handler for reference).
In the raw data mode, the data values arrive at a specific interval chosen with a call to accel_service_set_sampling_rate(), and the number of samples in a batch can be chosen using accel_service_set_samples_per_update(). We will stick with the default rate and update size for simplicity. Be aware that this mode will drain the battery significantly faster than the tap mode.
Next, we will create a new handler function to let us access the data that arrives from the Event Service. Accessing the data is as simple as reading the fields in the data parameter in the handler, as shown below:
static void accel_raw_handler(AccelData *data, uint32_t num_samples)
{
  static char buffer[] = "XYZ: 9999 / 9999 / 9999";
  snprintf(buffer, sizeof("XYZ: 9999 / 9999 / 9999"), "XYZ: %d / %d / %d", data[0].x, data[0].y, data[0].z);
  text_layer_set_text(accel_layer, buffer);
}
Finally, we add the new subscription, making sure we have disabled the one one in init():
//Subscribe to AccelerometerService (uncomment one to choose)
//accel_tap_service_subscribe(accel_tap_handler);
accel_data_service_subscribe(1, accel_raw_handler);
Now this is all in place, re-compile and re-install the watch app to see the live values. Try tilting the watch in each axis to see the constant g acceleration act on each in turn.
The final result should look like this:

Conclusion
So, that’s the new Event Services. As I mentioned, there is another called the App Focus Service which tells you when your app is covered by a notification, but it works in a very similar way to the Bluetooth Connection Service, so you should be able to figure it out!
The full source code can be found here on GitHub.


